Reference: Rebuilding a Windows 7 Computer from "bare-metal" using OEM installation disks. This is not a step-by-step tutorial on how to build a new PC.
I rebuilt my main desktop computer from scratch today using OEM disks. This posting brings all of my favorite installation and setup tips into one article.
Windows 7 - Explorer Changes - Highly recommended
Windows 7 - Network Problems - The definitive fix for wireless drops
Windows 7 - Turn off UAC Nags on Icons
Windows 7 - Streamline Start Menus
Windows 7 - Cleanup Startup Programs
USB Drive Backup Speeds Slow - Recommended
Windows 7 - SP1 - Surprise, it may not be installed
WMP12 Audio CDs do not play in Car Stereo
Add 'Bit Rate' to Windows Explorer View
(Individual articles - from "Explorer Changes", above)
Windows 7 - Exposing the RUN command
Windows 7 - Show the MyComputer and Network Icons
Open Windows Explorer to Data directory
Optimizing Windows Paging / Swap Files - A bit nerdy and optional
Disk Imaging Cleanup steps - Do this when you are all done, before spinning the "golden" backup.
Sabtu, 10 Maret 2012
Right Mouse Click Stops Working
Problem: Windows 7's Right Mouse Click ("other-mouse-click" button) stops working after Office 2010 was installed. Sadly, this article does not contain a great solution to the problem.
Issue:
Right-Mouse click (aka Context menu) no longer works in any Office Application
Right-Mouse click does not work in Windows Explorer
Right-Mouse click works sporadically in Windows Explorer
Right-Mouse click does not work on desktop or start menu
Right-Mouse click does not work in other applications, such as Visual Studio, etc.
Quick Tests:
"other mouse-click" the desktop; confirm if the menu pops up
In Excel, other-mouse-click a cell; confirm if a context menu pops up
Initial Diagnostics:
This was not a hardware problem
This is not a control-panel, mouse-configuration problem
Installing or re-installing Mouse driver did not resolve the problem
De-installing recent software (e.g. Office 2010) did not resolve the problem
Suspicion:
Another program has installed a Context Menu subsystem that was interfering with the operating system's menus. Knowing the history of my desktop computer, the most likely suspect was a recent Office-2010 upgrade (from Office 2007) or perhaps (unlikely) WinZip Pro. In both cases, de-installing did not resolve the problem.
I do not have definitive proof Office 2010 was the problem. Other posts on the web point in this direction, but most noted the context menus did not work in MSWord. I suspect context menus were failing everywhere. There is a possibility a recent Microsoft Patch (on or about 2012.03.06) could have caused the issue.
Inconclusive Detailed Diagnostics:
Using a program called "ShellMenuView," you can selectively disable the shell menus for individual programs, until you find the culprit:
ShellMenuView v1.15 by Nir Sofer (safe for Windows 7)
Web Site: http://www.nirsoft.net
This program is easy to use and understand. It is recommended to disable all non-Microsoft context menus and reboot the computer to test. Then, slowly re-enable each individual program until the problem-child is found.
What I discovered was the problem persisted, even after disabling all third-party, and then later, all Microsoft context menus. Testing is tedious because after each change, it takes a reboot. Additionally, I saw evidence where the context menu would work sometimes, but not others -- usually failing. Results, even with this tool were inconclusive.
Brute-Force Solution 1:
You are not going to like this solution. Normally, I like to find the actual problem, one that is more than un-install/re-install, but in this case, I could not find the answer. I decided to restore a recent image backup and start over.
I did this, using Acronis True Image, but found my most recent image still had the problem, which surprised me because this image was prior to Office 2010. However, I had fiddled with I-nfopath Forms and One-Note. That makes me a bad-boy for not having a solid backup.
Prior images were too old to be useful.
Brute-Force Solution 2:
If you didn't like Solution 1, you won't like this one. Because my machine was now several years old and has seen a lot of traffic, I thought it might be best to start over and do a bare-metal OEM install, rebuilding the machine from scratch. It is like having a new computer and it would give me a lot of fodder for this blog.
Also, because I just had an appendectomy the other day, I had few better things to do. I realize this won't help your computer. I would have preferred a real solution. Clearly, many people are having this issue.
Results: Problem solved. Although it took most of the day to rebuild, all Context menus work. Office 2010 is installed; all patches applied.
Recommendations:
As a caution, prior to installing Office 2010, take an image backup, then test the context menus. My guess is my context menus were damaged for several days, perhaps a week ago, and I had not noticed. Admittedly, the machine "felt weird" during the past week, where expected features were not working.
Your unregistered comments on a better solution are welcome.
Jumat, 09 Maret 2012
Windows 7 SP1
Howto: Windows 7 SP1 Updates
Microsoft Windows 7 SP1 installation instructions.
This week I had to restore an original OEM disk image on a machine. Once restored, I allowed Microsoft Update to update all files. To my surprise, Windows 7 SP1 was not installed. Instead, a myriad of smaller patches were applied -- and SP1 was not offered.
Because of this, SP1 needs to be installed manually, using these steps.
How to tell if Windows 7 SP1 is installed:
1. From Windows Explorer, "other-mouse-click" "Computer"
2. Choose (myComputer) Properties
3. Note is Service Pack 1 is listed.

Using Windows Update:
Ideally, Windows Update will present the patch. If available, this is the fastest way to install SP1 on a single computer. However, in my case, the patch was not offered and I had to use the manual method found in the next section. See this Microsoft article for complete details:http://windows.microsoft.com/installwindows7sp1
1. Select Start, Control Panel, Windows Update.
2. In the "Important" section, look for "Windows 7 Service Pack 1 KB976932".
The Windows Update size varies from 73MB to 900MB, depending on what maintenance you had previously applied. For a single computer, this is likely faster than downloading the entire executable. For example, on my laptop, which was current with Microsoft patches, the update was 90MB.
3. If the patch is found, allow the update to proceed.
Downloading Manually:
If you have multiple computers, or if you intend to rebuild the PC in the future, or SP1 was not offered, consider downloading the entire installation file. This way, the file can be used multiple times and can be written to DVD. The download is approximately 1G. Downloading and patching will take nearly three hours, depending on your Internet speeds.
To download, follow these steps:
1. Determine which operating system you have installed:
Windows 7 x64 bit or Windows 7 x32 bit
Determine Steps:
a. Start Windows Explorer
b. On the tree-side, locate "My Computer" ("Computer").
c. Other-mouse-click "My Computer", Properties
d. In the center of the report, under System, note the System Type:
"64-bit" or "32-bit"
2. Open Internet Explorer (must use IE). Go to this Microsoft page:
Windows 7 and Windows Server 2008 R2 SP1 KB976932
Use this link to download the re-distributable:
http://www.microsoft.com/download/en/details.aspx?displaylang=en&id=5842
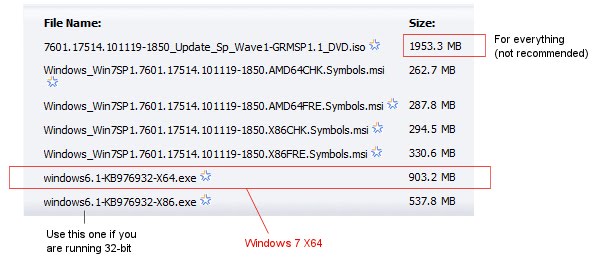
3. From the "Continue" File name screen, choose one of the following. Most likely, you should select the x64 version.
For X64 computers, choose windows6.1-KB976932-X64.exe
For X32, choose windows6.1-KB976932-X86.exe
 Download the file, saving it a known location on your hard disk.
The larger, 2GB download contains every possible install; use this if you have a mixture of multiple 32 and 64-bit computers.
Installing:
4. Optional Step: Once the download completes, disconnect the computer from the network and disable the virus scanners (turn off real-time scanning). Doing this will speed the installation.
For example, to disable Microsoft Security Essentials MSE:
a. Open the MSE icon in the system tray
b. Click the Settings tab
c. Click "Real Time Protection" on the left
d. Uncheck [ ] "Turn on real-time protection"
5. Launch the downloaded installation file. Installation will take apx 30-25 minutes. The install will linger at the 50% - 60% mark for a considerable period. Be patient. Reboot when prompted. If you are on a laptop, use AC power prior to launching.
6. Re-enable virus scanning, if disabled. This would be a good time to consider another disk-image backup.
7. Optional cleanup.
Microsoft builds a (900mb, size varies) backup of the SP1 files. These can be deleted.
a. Open Windows Explorer
b. "Other-mouse-click" Computer; choose "Properties"
c. In the [General] tab, click "Disk Cleanup"
d. Check "[x] Service Pack Backup Files.
e. Click OK, OK to erase.
See this article for other details on things to delete: Keyliner Disk Cleanup Steps.

Errata:
Details on the 800 updates can be found in this KB article: Download XLS Link: KB976932. This is a relatively boring document. Additional documentation can be found on the same page.
Related articles:
Windows 7 Rebuild - A compilation of all kinds of interesting tips
Cleaning up Startup Programs
Streamline Windows 7 Start Menus
Turn off Start Menu UAC Nags
Windows 7 Recommended Explorer Changes
Microsoft Security Essentials
Windows 7 Slow USB Drives
Windows 7 Unidentified Network Problem
Microsoft Windows 7 SP1 installation instructions.
This week I had to restore an original OEM disk image on a machine. Once restored, I allowed Microsoft Update to update all files. To my surprise, Windows 7 SP1 was not installed. Instead, a myriad of smaller patches were applied -- and SP1 was not offered.
Because of this, SP1 needs to be installed manually, using these steps.
How to tell if Windows 7 SP1 is installed:
1. From Windows Explorer, "other-mouse-click" "Computer"
2. Choose (myComputer) Properties
3. Note is Service Pack 1 is listed.

Using Windows Update:
Ideally, Windows Update will present the patch. If available, this is the fastest way to install SP1 on a single computer. However, in my case, the patch was not offered and I had to use the manual method found in the next section. See this Microsoft article for complete details:http://windows.microsoft.com/installwindows7sp1
1. Select Start, Control Panel, Windows Update.
2. In the "Important" section, look for "Windows 7 Service Pack 1 KB976932".
The Windows Update size varies from 73MB to 900MB, depending on what maintenance you had previously applied. For a single computer, this is likely faster than downloading the entire executable. For example, on my laptop, which was current with Microsoft patches, the update was 90MB.
3. If the patch is found, allow the update to proceed.
Downloading Manually:
If you have multiple computers, or if you intend to rebuild the PC in the future, or SP1 was not offered, consider downloading the entire installation file. This way, the file can be used multiple times and can be written to DVD. The download is approximately 1G. Downloading and patching will take nearly three hours, depending on your Internet speeds.
To download, follow these steps:
1. Determine which operating system you have installed:
Windows 7 x64 bit or Windows 7 x32 bit
Determine Steps:
a. Start Windows Explorer
b. On the tree-side, locate "My Computer" ("Computer").
c. Other-mouse-click "My Computer", Properties
d. In the center of the report, under System, note the System Type:
"64-bit" or "32-bit"
2. Open Internet Explorer (must use IE). Go to this Microsoft page:
Windows 7 and Windows Server 2008 R2 SP1 KB976932
Use this link to download the re-distributable:
http://www.microsoft.com/download/en/details.aspx?displaylang=en&id=5842
3. From the "Continue" File name screen, choose one of the following. Most likely, you should select the x64 version.
For X64 computers, choose windows6.1-KB976932-X64.exe
For X32, choose windows6.1-KB976932-X86.exe
Download the file, saving it a known location on your hard disk.The larger, 2GB download contains every possible install; use this if you have a mixture of multiple 32 and 64-bit computers.
Installing:
4. Optional Step: Once the download completes, disconnect the computer from the network and disable the virus scanners (turn off real-time scanning). Doing this will speed the installation.
For example, to disable Microsoft Security Essentials MSE:
a. Open the MSE icon in the system tray
b. Click the Settings tab
c. Click "Real Time Protection" on the left
d. Uncheck [ ] "Turn on real-time protection"
5. Launch the downloaded installation file. Installation will take apx 30-25 minutes. The install will linger at the 50% - 60% mark for a considerable period. Be patient. Reboot when prompted. If you are on a laptop, use AC power prior to launching.
6. Re-enable virus scanning, if disabled. This would be a good time to consider another disk-image backup.
7. Optional cleanup.
Microsoft builds a (900mb, size varies) backup of the SP1 files. These can be deleted.
a. Open Windows Explorer
b. "Other-mouse-click" Computer; choose "Properties"
c. In the [General] tab, click "Disk Cleanup"
d. Check "[x] Service Pack Backup Files.
e. Click OK, OK to erase.
See this article for other details on things to delete: Keyliner Disk Cleanup Steps.

Errata:
Details on the 800 updates can be found in this KB article: Download XLS Link: KB976932. This is a relatively boring document. Additional documentation can be found on the same page.
Related articles:
Windows 7 Rebuild - A compilation of all kinds of interesting tips
Cleaning up Startup Programs
Streamline Windows 7 Start Menus
Turn off Start Menu UAC Nags
Windows 7 Recommended Explorer Changes
Microsoft Security Essentials
Windows 7 Slow USB Drives
Windows 7 Unidentified Network Problem
Kamis, 01 Maret 2012
USB Drive Backup Speed Slow
Howto: Speed-up all USB drives in Windows 7. USB speeds for all Thumb drives, cameras, and other external USB disks will be much faster with a minor tweak. This change is recommended.
 When I converted my Dell XPS M1530 laptop to Windows 7 64 and ran an Acronis 2010 full system USB backup, the backup speeds were horribly slow -- slow enough to where 50G was going to take 8 hours. The backup should only take about 20 minutes.
At first I thought it was a problem with the 64-bit drivers and then I suspected a problem with the backup program but the real issue turned out to be Windows 7. This turned out to be interesting and is applicable to all kinds of devices.

Solution:
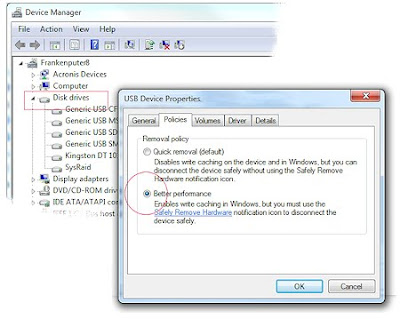
In Device Manager, change the drive's USB Policy to "Better Performance".
Follow these steps - which must be done for each plugged-in USB Device where you want the improved speed.
1. Plug-in the USB drive and allow it to mount normally.
2. Start, Control Panel, "Device Manager"
3. Open the "Disk Drive" section, locate the USB drive section (illustrated in red box). In the details, locate the USB drive. Make these changes:
a. Other-mouse-click (right mouse) the drive, Properties
b. Click the [Policies] tab
c. Choose "Better Performance"; Click OK and close the control panel
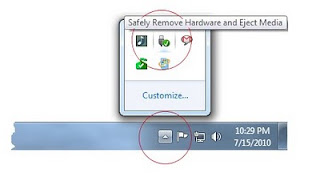
4. In the System Tray, click the arrow to expand hidden icons; choose the USB icon ("Safely Remove Hardware and Eject Media); eject the disk and unplug the USB cable. Re-plug-in the disk for the changes to take effect.

Hard Disk Cache:
As an aside, the local Hard Disk has a similar setting, which I also enable on my own computers.
A. In Control Panel, Disk Drives, locate the hard disk (may be labeled as "ATA Device")
B. Select Properties
[x] Enable Write Caching on the Device
[x] Turn off Windows Write-cache buffer flushing on this device*
*only recommend doing this on battery-powered laptops and on desktops with UPS protection.

Results:
USB Disk operations will be a zillion times faster. The new backup took exactly 23 minutes, which was a slight improvement over the original 8 hours. Even standard file-copies to this drive were improved.
If you purchase a new USB drive, you will need to do this same setting. Set one time per device, regardless of which USB port it is plugged into.
This holds true with thumb drives, cameras and all other external writable drives. I have not researched, but there is probably a global policy which can set this for all devices.
Drawbacks:
 If you like to jerk the USB drive when you are done, you may be in trouble. With this change, you must click the system-tray icon and eject the disk in a controlled manner. Out of habit, you should be doing this anyway -- just to keep drives from corrupting. Cameras seem to corrupt their memory cards more-often-than-not. It is probably best to leave the USB settings for this device unchanged because they tend to have their USB cables unplugged because everyone is always in a rush.
Microsoft made a conservative default setting, which allows you to pull drives without fiddling around with software. But if you make these changes, you will have to exercise restraint when pulling a drive; you will have to use the System Tray.
Related Articles:
Disk Imaging Cleanup Steps - Make your backups faster
Acronis 2010 Step-by-Step
Recovering a single file with Acronis
Windows 7 Explorer Changes
Vista Spiffs -- making lots of things faster
Streamline Windows Start Menus
Seagate - Expansion Desktop 2TB USB 3.0 External Hard Drive
At first I thought it was a problem with the 64-bit drivers and then I suspected a problem with the backup program but the real issue turned out to be Windows 7. This turned out to be interesting and is applicable to all kinds of devices.
Solution:
In Device Manager, change the drive's USB Policy to "Better Performance".
Follow these steps - which must be done for each plugged-in USB Device where you want the improved speed.
1. Plug-in the USB drive and allow it to mount normally.
2. Start, Control Panel, "Device Manager"
3. Open the "Disk Drive" section, locate the USB drive section (illustrated in red box). In the details, locate the USB drive. Make these changes:
a. Other-mouse-click (right mouse) the drive, Properties
b. Click the [Policies] tab
c. Choose "Better Performance"; Click OK and close the control panel

4. In the System Tray, click the arrow to expand hidden icons; choose the USB icon ("Safely Remove Hardware and Eject Media); eject the disk and unplug the USB cable. Re-plug-in the disk for the changes to take effect.

Hard Disk Cache:
As an aside, the local Hard Disk has a similar setting, which I also enable on my own computers.
A. In Control Panel, Disk Drives, locate the hard disk (may be labeled as "ATA Device")
B. Select Properties
[x] Enable Write Caching on the Device
[x] Turn off Windows Write-cache buffer flushing on this device*
*only recommend doing this on battery-powered laptops and on desktops with UPS protection.
Results:
USB Disk operations will be a zillion times faster. The new backup took exactly 23 minutes, which was a slight improvement over the original 8 hours. Even standard file-copies to this drive were improved.
If you purchase a new USB drive, you will need to do this same setting. Set one time per device, regardless of which USB port it is plugged into.
This holds true with thumb drives, cameras and all other external writable drives. I have not researched, but there is probably a global policy which can set this for all devices.
Drawbacks:
Microsoft made a conservative default setting, which allows you to pull drives without fiddling around with software. But if you make these changes, you will have to exercise restraint when pulling a drive; you will have to use the System Tray.
Related Articles:
Disk Imaging Cleanup Steps - Make your backups faster
Acronis 2010 Step-by-Step
Recovering a single file with Acronis
Windows 7 Explorer Changes
Vista Spiffs -- making lots of things faster
Streamline Windows Start Menus
Seagate - Expansion Desktop 2TB USB 3.0 External Hard Drive
Langganan:
Postingan (Atom)