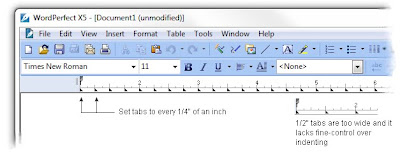
Set a default tab (ruler-bar) for this and all new documents. By default, tab stops are every 1/2 inch -- which is too wide. Set the tab-settings every 1/4" inch. This also sets a handy Margin Release. This same screen can set a default font, widows and orphans, and other default settings.
This article is a subset of a longer Keyliner article: Using WordPerfect for School Papers.
Setting Tabs:

1. From any (blank) document, choose top menu Format, Styles: Choose "DocumentStyle"
2. Click Edit to open the "Style Editor"
Important: Confirm "[x] Use as default" is checked in the lower-right corner
3. Click the mouse in the "Contents" text-section
4. Choose sub-menu, Format, Line, TabSet
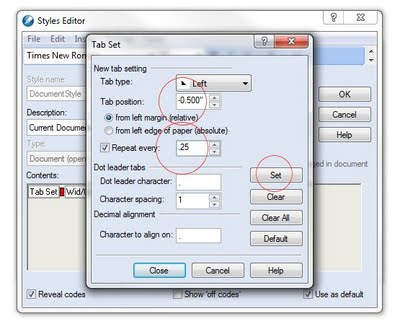
5. Confirm Tab Type = Left
6. Change Tab Position to -0.5 (negative point 5)
7. Click box [x] Repeat every .25 (point 25)
8. Click "Set", then Close.
 (Note in the Reveal Codes a new "TabSet". There should only be one TabSet code; delete any duplicates or older codes you may find before making the new tab-setting.)
 Also Recommended:
While in the same Contents Text box, you can also set these recommended settings:
- Default Font
- Default Font Size
- Widow and Orphan Protection (Keep Text Together)
 |
| Click for larger view |
Margin Release Example:
Notice how tab stops are set 1/2" to the left of the Left margin (-.5) -- this is called a "Margin Release." Often, in a paper, a Hanging Header is needed. With this setting, you can quickly type a bolded title that "sticks out past the margin" without having to fiddle with the ruler-bar or with margins.
To use the Margin Release:
- At the beginning of a paragraph, press Shift-Tab to hang the heading. Press shift-tab a second time to go one more stop to the left.
Related articles:
Using WordPerfect for School Papers
Protect Text Across Page Breaks
Hanging Indents past Left Margin
WordPerfect Sets Tabs in White Space
Wordperfect Office X5 Home & Stud Mb Cs Wpx5enhsmbc

Tidak ada komentar:
Posting Komentar