Senin, 30 Juli 2012

A collection of Opensource Software

Open source software  is mainly distributed by the world best dedicated programmers. They are completely free. There are no legal restrictions on the use of such software. Open source software is much better than the purchased software. For example, for  web design, the whole world needs most this Open source Software like Joomla or Wordpress and obviously they are the best.

Office Application:
Open Office: http://download.cnet.com/OpenOffice-org/3000-18483_4-10263109.html?tag=mncol;rbxcrdl1

Operating system
(ubuntu): http://www.ubuntu.com/

Free Bangla writing software:
Avro: http://www.omicronlab.com/avro-keyboard-beta.html
Web Browsers
Chorme - http://www.google.com/chrome
Firefox - http://www.mozilla.com/en-US/firefox/firefox.html?from=getfirefox
K-Meleon - http://kmeleon.sourceforge.net/wiki/Download
Flock - http://www.flock.com/
Opera - http://www.opera.com/
Anti-Virus
AntiVir - http://www.avira.com/en/avira-free-antivirus
Avast - http://download.cnet.com/Avast-Free-Antivirus/3000-2239_4-10019223.html?part=dl-85737&subj=dl&tag=button
AVG - http://download.cnet.com/AVG-Anti-Virus-Free-Edition-2011/3000-2239_4-10320142.html?part=dl-10044820&subj=dl&tag=button&cdlPid=11014801
ClamWin - http://www.clamwin.com/content/view/18/46/


Chatting Software

Yahoo! Messenger - http://messenger.yahoo.com/download/win/

Google Talk - http://www.google.com/talk/
AMSN - http://www.amsn-project.net/download.php
Skype - http://www.skype.com/intl/en/business/skype-manager/

Web design & development
Joomla: http://www.joomla.org/download.html
WordPress: http://wordpress.org/download/
Php: http://php.en.softonic.com/
Xampp: http://download.cnet.com/XAMPP/3000-10248_4-10703782.html
Html tool: http://www.all-freeware.com/subcat/161/web-development/web-html-tools.html
Css & others: http://www.all-freeware.com/subcat/164/web-development/web-other.html
Flash tool: http://www.all-freeware.com/subcat/160/web-development/web-flash-tools.html

Photo/image Editing

GIMP - http://www.gimp.org/downloads/
Inkscape - http://inkscape.org/
Paint.net - http://www.dotpdn.com/downloads/pdn.html

Download Managers
Flashget - http://www.amazesoft.com/index_en.htm
Free Download Manager - http://www.freedownloadmanager.org/download.htm
LeechGet - http://www.leechget.net/en/

Desktop Customization
Desktop Sidebar - http://www.desktopsidebar.com/download.html
Glass2k - http://chime.tv/products/glass2k.shtml
CursorXP - http://download.cnet.com/CursorFX/3000-2317_4-10070056.html?part=dl-80664&subj=dl&tag=button
Rainlendar - http://www.rainlendar.net/cms/index.php?option=com_rny_download&Itemid=32

Archive Managers (Zip software)

Quick Zip 5.1 - http://www.softpedia.com/get/Compression-tools/Quick-Zip.shtml
7-zip - http://www.7-zip.org/
KGB Archiver - http://kgbarchiver.net/
Compress it - http://www.rg-software.de/
TUGZip - http://www.tugzip.com/Downloads.html

Audio players
AIMP2 - http://www.aimp.ru/index.php?do=download
iTunes - http://www.apple.com/itunes/download/
Jet Audio Basic - http://download.cnet.com/JetAudio-Basic/3000-2141_4-10013740.html?part=dl-56361&subj=dl&tag=button
Foobar 2000 - http://www.foobar2000.org/download
Songbird - http://getsongbird.com/


CD/DVD Burning
Burn4Free - http://download.cnet.com/Burn4Free-CD-and-DVD/3000-2646_4-10217894.html?part=dl-6225127&subj=dl&tag=button
Deepburner - http://www.deepburner.com/download
ImgBurner - http://fileforum.betanews.com/detail/ImgBurn/1128426215/1
CDBurnerXP - http://www.cdburnerxp.se/
Infra Recorder - http://infrarecorder.org/?page_id=5
Ultimate CD/DVD Burner - http://www.mispbo.com/download.htm

Anti-Spyware
Malwarebytes Anti-Malware - http://fileforum.betanews.com/detail/Malwarebytes-AntiMalware/1186760019/1
Ad-aware SE Personal – http://download.cnet.com/Ad-Aware-Free-Internet-Security/3000-8022_4-10045910.html?part=dl-ad-aware&subj=dl&tag=top5
ComboFix – http://www.bleepingcomputer.com/download/anti-virus/combofix
Microsoft Windows Defender – http://www.microsoft.com/downloads/en/details.aspx?FamilyId=435BFCE7-DA2B-4A6A-AFA4-F7F14E605A0D&displaylang=en&mg_id=10134
WinPatrol - http://www.winpatrol.com/download.html


3D Modeling

Blender - http://www.blender.org/download/get-blender/
Google Sketchup - http://sketchup.google.com/download/gsu.html


Defrag Software
Auslogics Disk Defrag - http://download.cnet.com/Auslogics-Disk-Defrag/3000-2094_4-10567503.html?part=dl-6267754&subj=dl&tag=button
JKDefrag - http://www.kessels.com/JkDefrag/index.html

Video Codecs
Real Alternative – http://www.free-codecs.com/real_alternative_download.htm
K-lite codec pack - http://fileforum.betanews.com/detail/KLite-Codec-Pack-Basic/1094057842/1
Combined Community Codec Pack (cccp) - http://www.cccp-project.net/

File Managers
2xExplorer - http://www.free-downloads.net/downloads/2xExplorer/
ExplorerXP - http://www.explorerxp.com/index.html#download
CubicExplorer - http://www.cubicreality.com/ce/download/
Free Commander - http://www.freecommander.com/fc_downl_en.htm

Video Players
BsPlayer - http://bsplayer.en.softonic.com/
Crystal Player Proffesinoal 1.98 - http://download.cnet.com/Crystal-Player-Professional/3000-2139_4-10210499.html?part=6197219&subj=dlpage&tag=button
DivX Player - http://www.divx.com/
Media Player Classic – http://sourceforge.net/projects/mpc-hc/
VLC - http://www.videolan.org/
Gom Player - http://download.cnet.com/GOM-Media-Player/3000-13632_4-10551786.html?part=dl-GOMMediaP&subj=dl&tag=button

Email Clients
Foxmail – http://www.softpedia.com/progDownload/Foxmail-Download-4236.html
Thunderbird - http://www.mozillamessaging.com/en-US/thunderbird/
Evolution for Windows - http://www.dipconsultants.com/evolution/download.htm
Zimbra – http://www.zimbra.com/products/desktop.html

File Repair and Recovery
Avira UnErase Personal – http://www.softpedia.com/progDownload/Avira-UnErase-Personal-Download-82776.html
ADRC Data Recovery Software Tools -http://www.adrc.com/software/data_recovery_tools/
FreeUndelete - http://www.officerecovery.com/
PC Inspector File Recovery - http://www.pcinspector.de/default.htm

FTP Clients Software

CoreFTP - http://www.coreftp.com/download.html
Filezilla - http://sourceforge.net/projects/filezilla/
SmartFTP - http://www.smartftp.com/download/

Image Capture
MWSnap - http://www.mirekw.com/winfreeware/mwsnap.html

Image  Viewers
FastStone Image Viwer - http://www.faststone.org/FSViewerDownload.htm
Irfanview - http://download.cnet.com/IrfanView/3000-2192_4-10021962.html?part=dl-IrfanView&subj=dl&tag=button

System Tools
Auto Hotkey - http://www.autohotkey.com/download/

Webcam Software
booruWebCam - http://www.booru.net/download.html
Pryme - http://www.hilo.dk/pryme/
Splitcam - http://www.splitcamera.com/index.html

i f you want more then you can use those link to find your desire  open source software

http://www.liberkey.com/en/suites/liberkey-standard.html
 http://www.fileguru.com/

Thank you.

Minggu, 29 Juli 2012

Copying Large Files to Android Tablet

Discussion: Copying Large files to Android Tablets.  Problems copying files larger than 1G. "Windows has stopped working".
After digitizing a movie, I wanted to copy a large 4G file to an Android tablet and was surprised at how challenging this was.  Symptoms: Windows starts the file copy but does not get past the estimated time calculation and the copy fails. 

Normally it is a simple matter to connect the tablet to the computer with a USB cable and copy the files with Windows Explorer.  However, there is a known Microsoft Windows limitation where Explorer runs out of cache and the file copy may fail.  I have seen inconsistent results where some large files succeed while others fail; reasons undetermined. 

Wish you could Map a drive on an Android

In a perfect world, you could "map" a drive letter to the Android through the USB cable -- actually, this would be interesting with any USB device, but this is not possible.   *If* a drive letter/UNC could be assigned to the tablet's folders, there are several tools which can always copy large files:
  • Use DOS XCOPY with a /J switch -- Starting in Windows 7  2008R2, "/J" tells XCopy to use an unbuffered (non-cached) copy and was especially designed for large files.
  • Use RoboCopy (a Microsoft utility designed for automated batch copies), which also works well with large files.
  • Consider using teracopy http://codesector.com/teracopy, which I have not yet tried, but seems popular on the net.

Why not copy to an SD-Card?
SD Cards are almost always formatted as FAT32 (a file system format) and they cannot handle files larger than 4G.

Using FTP to copy Large Files

Because I could not get my copy to run, I used FTP (File Transfer Protocol).  This was a much slower than a local copy and even though the tablet was connected via USB, I had to make the copy over wireless.  A 4G copy took about an hour.  Here are the steps I used and these steps work inside of your local (home) network.

1.  From the Android control panel / Settings Screen, find your tablet's IP Address.  You will need this during the file-transfer step.

With my Asus Transformer tablet, this was found in the System, scroll down and tap the "About Tablet" menu.  Click "Status". Note the IP address.  For example, my device was 192.168.200.124

2.  From the Android Play Store (App Store), download and install the free "My FTP Server" to the Android.  This simple app turns you Android into an FTP Server.

"My FTP Server", by Boby Ertanto
As of 2012.07, version 1.4

3.  Once installed and launched, click the "Tools" gear-icon (upper-right corner).

For security, change the user-ID to an ID of your choosing, I used "user"
Change the password
[x] Check "Keep phone awake"
Save
Click "Start Server"

When the ftp server starts, ignore the displayed ftp url, you really want to use the IP Address.

4.  On your local PC use any Windows-based FTP Client and connect to the Android's new FTP service.

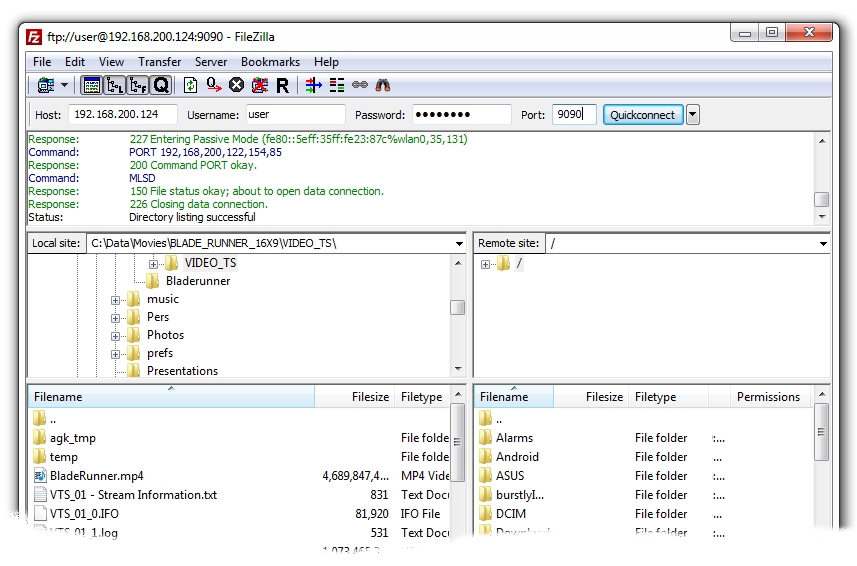
Note: Windows does not come with an FTP client (The built-in DOS FTP will not work because the Android software will use Passive-mode FTP).  The easy work-around is to use a more sophisticated client. I like to use the free and easy-to-use FileZilla FTP Client.  http://filezilla-project.org/.  Screenshot below; click for a larger view.


Connecting with FileZilla: 

Host:  192.168.200.124 (your address will be different)
Username:  user  (or as set above)
Password: (as set)
Port: 9090
Click button "QuickConnect"

5.  Upload the file (copy) to the Android. 

From the Source window (left-side), click and drag the source file from the left-side to the right.  The file transfer will run.

6.  When done, on the Android, stop the FTP Server (tap "Stop Server") and close FileZilla.

Rabu, 27 Juni 2012

MSE - Microsoft Security Essentials

If you practice safe surfing habits and have a good backup strategy, consider installing Microsoft's Security Essentials (MSE). It is fast, unobtrusive and free. Article originally published 2010.05.  Updated 2012.06.    


I am asked to fix friend and family computers and I get asked to fix friends-of-friends computers. The number-one complaint is invariably the same: "the computer is too slow," along with "it used to be faster -- should I buy a new computer?"


As I've worked on these machines, the most common reasons for slowness are, in order:
  • McAfee Virus Scanner
  • Norton Symantec Virus Scanner
  • AVG Virus Scanner
  • Too many (legitimate) programs running in the background (system tray)
  • Actual viruses and spyware problems
  • Insufficient RAM; dial-up Internet; really-old computers
Notice that viruses are not at the top of the list.  In other words, the machines are generally virus-free.  The best solution has been to uninstall the virus scanners.

Current Affairs

The expense and complexity of the commercial versions have driven me away.  To gain market share and revenue, they add features and raise prices. In the end, the McAfee and Symantec/Norton suites are too complicated and the software does so many things that system resources are fully-consumed. Admittedly, these products do more than just scan for viruses. 

But if you practice safe surfing habits, then these other products may be overkill.  Safe habits include:
  • Avoid free music bit-torrent sites and porn.
  • Surf with Firefox (not IE), keeping ActiveX from running.
  • Up-to-date with Adobe Acrobat and Flash patches.
  • Full-system disk image backups on a regular basis.
  • Keep teenagers off your computer and give them their own machine.
Improvements:

In the past two years, both Norton and McAfee have improved their software and they now have smaller footprints.  If I had at-risk computers, where virus infections were a re-occurring problem, I would consider more robust software and would probably choose a Norton product.  But in general, I still do not trust most commercial virus scanners.  Case-in-point, McAfee is aggressively installing on unsuspecting users.  See this Keyliner article: McAfee Security Scan Plus.

PC Magazine's most recent Virus Scanner Reviews 2012, seem a little vague and almost non-committal and it doesn't mention Microsoft's product.  In a separate review, PC magazine rates MSE 2012 as mediocre, but most other reviewers generally like Microsoft's product.  The biggest failing is when a machine is already infected. I agree.  On an already-infected machine, you need to use several tools, including Microsoft's bootable "Windows Defender Offline", along with other's, such as Malaware Bytes (see Keyliner article:Removing Win32/Cryptor).


What I am Doing Now

I now exclusively use Microsoft's Security Essentials.  

Although Microsoft claims they are not competing with commercial software, they are doing relatively well and by most accounts, MSE is a decent program. Almost all reviewers report the software is capable and does not sap system resources.

Download directly from Microsoft by using this address:
http://www.microsoft.com/security_essentials

Benefits:
  • It is tightly-integrated into Windows and runs well in Windows 7 and XP.
  • Performance is invisible.
  • Unobtrusive - no nagging.
  • Quiet, automatic updates; several times per day.
  • A simple, straight-forward user-interface.
  • It is free; no registration; fully-functional; no upgrades to paid packages.
MSE not only uses virus signatures to detect malware, it can also flag suspicious activity, such as an unexpected network connection, modifications to system files, or if software attempts to download in the background. When MSE sees activity like this, it automatically sends the suspected malware to Microsoft's servers for analysis. With 100 million PC's, this gives Microsoft a good pool for correcting problems.

Drawbacks:

Because it can't be configured or controlled from a central server, it is not suited or licensed for business use.

Rootkit detection is weak and you should not rely on this tool to repair an already infected machine. With a raging infection, you will probably have to rely on other tools before MSE can be effective.  I recommend starting with Microsoft Standalone Windows Defender and then see these popular Keyliner articles: Removing Win32/Cryptor and Removing Personal Security ).


Downloading and Installing

Download directly from Microsoft by using this address:
http://www.microsoft.com/security_essentials

Installation is easy and even your grandmother can do this. 
Un-install old virus scanners before installing MSE.
If you have Microsoft's older Windows Defender, it is automatically disabled.

Once installed, let it kick-off a full scan. From then-on, you can basically ignore the software. When it does have something to say, it is obvious and UAC nag-screens appears, assuring you are not looking at a virus-look-alike.


Conclusions:

I am pleased and now use MSE on all my personal equipment. Microsoft Security Essentials may not be as powerful as other packages, but I have a low risk of infection and am comfortable with my backup strategies.  For at-risk computers, a more robust solution is needed and I would tentatively recommend Norton Antivirus 2012.  Some day, I may give Norton/Symantec and McAfee another try.


Related Keyliner articles:

Use this when your machine is already infected.
Microsoft Standalone Windows Defender.
Removing Win32/Cryptor
Removing Personal Security


HowTo: Fixing Slow Computers
HowTo: Cleaning Windows 7 Startup Programs

HowTo: CPU Utilization and Diagnostics

Reviews:
PC Magazine Virus Scanner Reviews 2012
PC magazine rates MSE 2012
PC Magazine Norton Antivirus 2012 Review

Sabtu, 23 Juni 2012

Captain UnderPants Name Maker Program

For fun:  Captain Under Pants Name Maker.

A decade ago, when my children were little, they were reading the adventures of Captain Underpants, by Dave Pilkey.  In one of the stories, the book asked the kids to take a letter from their first and last name.  They were then instructed to look in a chart to generate a new name. Their new names were well-suited for people that age.

This looked fun and I wrote a program around the idea for my kids.  We played with this off-and-on for a few years until I out-grew it.  Today I stumbled across it again and thought it would be fun to post.

This is a screenshot of the program:

To use, type your name, press enter, and it generates a new name.  President George W. Bush is "Fluffy Toiletshorts" while President Obama gets "Cheeseball Hamsterbiscuits."  My name is nothing to brag about either, I get the ignominious "Tootie Picklelicker."

To download, click this Keyliner Public GDrive link:
NameMaker Download

The program is a simple EXE that installs with a file-copy.  There are no registry changes or installation routines and it was written in VB6. 

The name-selection algorithm is slightly more complex than the author's original design and that makes it more fun. Scattered throughout the screen are numerous Easter eggs with jokes that will make you groan.  It will take a lot of clicking to get through them all.


At the risk of cease-and-desist, and with apologies to Mr. Pilkey, you are welcome to download and have fun.

Jumat, 22 Juni 2012

Installing SQL Tools Management Studio

Where is SQL Server Management Studio Express 2012?
Installing SQL Server Management Studio Express Tools

If you had recently upgraded your development copy of SQL Express, and are looking for the management tools, I found it after an hour of searching.  Microsoft did not make this obvious.

It is probably in your original SQL Server Express installation file, provided you originally downloaded "SQL Server Express 2012 with Tools"  (this also works with version 2010).  Here are the steps:

1.  Re-launch the original SQL Server Installation file
2.  Choose Installation, "New SQL Server stand-alone installation or add features..."
3.  Click Next on the Update screen.  Wait for the scan.

4.  On the "Installation Type" panel, click "Add Features to an existing instance".  Click Next.

5.  Choose "Management Tools - Basic".  Click Next and allow it to install.

The issue:  If you upgraded from a previous version, and did not have Management Studio Tools installed, the upgrade will not prompt you for them.  Microsoft's site seems to imply the tools are a separate download, they are not.

Executable details:
"C:\Program Files (x86)\Microsoft SQL Server\110\Tools\Binn\ManagementStudio\Ssms.exe"

Sabtu, 09 Juni 2012

Dell U2212HM 21.5 Widescreen Monitor

Review: Dell U2212HM 21.5 Widescreen Monitor.  In summary, this is a nice monitor at a good price with no complaints.  The monitor is sharp, bright, visible from wide angles.  It feels well-built and great connection options.  $230, direct from Dell.

The Dell Ultrasharp U2212HM 21.5-inch monitor with LED backlight is a fairly typical monitor with a really wide screen.  1920x1080 Full HD.

I chose this model over others because the screen rotates vertically and I thought this would be handy.

Photo: At home, rotated vertically, next to a Gateway 19.5" wide screen monitor, with a full-sized keyboard and mouse.  Even with this monitor, I still like to run with a dual monitor setup and this is my new, standard setup.  With the monitor in Landscape, the second monitor becomes a little difficult to use as it is pushed to the side.

Pros and Cons to Vertical

On reason to consider a vertical monitor is this observation:  Unless you are willing to fiddle with multiple windows on the screen, most of the width is wasted.  Consider these screen shots, which is typical with many programs running fullscreen:  The width is wasted.  But look at the glorious depth when in a vertical / portrait mode...


Spreadsheets probably like the width but they also like depth and an argument can be made both directions.  Other programs, such as photo editors, Visual Studio and other development environments make good use of wide screens for their tool-boxes but that is what dual monitors are for.

The most obvious drawback to the vertical (portrait) position is the 1080 pixel width.  Some programs are now being designed for 1280 and admittedly, most people run this monitor in Landscape. 


I was undecided about which orientation to use, but after several months, I decided the vertical was the best -- but I would only do this with a horizontal dual monitor system.  Admittedly, with bifocal glasses, the vertical orientation is somewhat challenging, but survivable.  It is nice to have the option.  My spouse thinks vertical is weird.

There is some humor to be found in the Windows Desktop Properties screen.  Look how I had to position the screens:

One of the drawbacks to rotating the screen back to Landscape is I have to fiddle with the screen positions again.  Perhaps Windows 8 will have a memory for this.


This is one of the few monitors on the market with movements along each axis.  The monitor's bottom edge can be dropped all the way down to the base and it can tilt -4 degrees forward in case the monitor is on a top-shelf on a factory floor.

The stand has a a cable run.  When rotating the monitor from landscape to portrait, cables have enough freedom to slip as the screen rotates.


Video Card vs Monitor

You may have a concern about your video card and memory with a 1920x1080 resolution screen.  I have a run-of-the-mill, boring $40 NVidia Gforce 210 512MB -- which is a dual-head video card.  It drives this monitor (DVI) and the Gateway wide-screen (as VGA) with no issues. 

My desktop has an HDMI video out but the monitor has a newer type of connection called a DisplayPort. With an adapter, not supplied, I could convert between the two, but this is not worth the trouble with the DVI-D port.  Besides, whenever you use a mother-board-supplied video, you are using system-RAM to drive the video and for this reason, I still prefer a dedicated video subsystem.  (In the future, CPU chips will have dedicated video processing and my attitude towards this may change.)

DisplayPorts are relatively new to the scene.  The technology is not meant to replace HDMI, instead, it has been optimized for computer tasks.  See this Wikipedia article for details.  From a laptop's point of view, here is a comparison showing the differences between the ports:


If Wishes were Fishes

When I bought the monitor, I was looking for a glossy-screen, much like I have seen in high-end laptops and on Apple desktops.  Glossy screens look sharper (even though they have the same number of pixels and the same pixel size), but Dell doesn't appear to sell such a device.  There is some argument to be made for high-gloss screens being a pain in sunlight.


I was tempted by Dell's newer line of "UltraSlim" monitors, a new line of monitors that are half the thickness, but decided while facing a monitor, all monitors appear paper-thin.  As long as it is not a CRT, the thickness is not worth a premium.  I'll revisit this belief when OLED monitors are affordable.  With the stand, the Ultra-Slim occupied nearly the same depth so nothing was gained and the monitor was not adjustable. 


Comparison with Less-Expensive Models

Dell sells a similarly-sized ST2220L 21.5 1920x1080 HD Widescreen for $140 and it has similar specifications, same resolution, same dot-pitch and brightness, but there are differences.

One difference is in the Dynamic Contrast Ratio:
The ST220 has 8M:1, compared to this monitor's 2M:1, which implies some of these numbers are a bunch of hooey.  The ST220's screen technology is an older, less-sharp "TN" technology and it has a simpler stand.  Finally, this model has an HDMI port instead DisplayPort, which may limit its usefulness over the lifetime of the monitor.


Technical Specs, direct from Dell's site:

54.6cm / 21.5" diagonal with 100% area viewable
IPS - Inplane Switching Panel
1920 x 1080 pixels, full HD
0.2475mm  (Better than many)
LED Backlit (now typical with almost all monitors)

250 cd/m2 Brightness
(typical for most mid-range monitors.  Nicer monitors can go up to 350.)

1000:1 Contrast Ratio
2M:1 Dynamic Contrast Ratio (which as near as I can tell, is mumbo-jumbo)
8ms (grey to grey) Response Time (hard to compare with other brands)
178 degree viewing angle (nice)
16M colors, 82% gamut (seems fairly typical for a mid-range monitor)

Dimensions of Interest:
Width:  20.2" Landscape
Height: 14" low to 19" extended
Depth: 7.2"

Width: 12" Portrait
Height: 21" low to 23" extended
Depth: 7.2"

Ports:
DVI-D with HDCP
DisplayPort (DP)
VGA
4 USB 2.0 downstream ports (standard USB plugs)
1 USB 2.0 upstream (hub) port
DC Power Plug for Dell SoundBar

Included Cables:
DVI
VGA
Power
Does not contain a DisplayPort cable, but few need this.


Installing a Laptop Wireless Network Card

How To: Installing a Laptop Network MINI Card.  Instructions on how to upgrade a laptop's older network card with a newer, faster card.  This article demonstrates an Intel 4965AGN Laptop Mini Card, being installed in an Dell XPS M1530.

After upgrading my home router from a Linksys WRT110 to a newer Linksys EA2700 Wireless N, I decided to upgrade my main laptop from an older Intel wireless 3945ABG to a 4965AGN.

Intel 4965AGN

The new card can run on either the older (802.11 a/b/g) at 2.4Ghz, or on the new N network, at 5Ghz.  On the faster side, data throughput improves from 54Mbs to 300Mbps.  The N standard also has up to 2x greater range.


Real-life Speed Test:

Why upgrade?  With computers, it is always the same reason.  I ran these speed tests. An "N" card on an "N" router is truly twice as fast as the older setup.

Copying 2,700 files, 500MB
802.11g (2.4Ghz old card) - Time 3:30 min
802.11n (5Ghz, new card) - Time 1:41 min


The card can be found on the net with prices ranging from $10 to $60.  Being cheap, I mail-ordered the $10 card from AMZNeTek and laughed with it arrived in an envelope with no disk or instructions.  What would I expect?  It was a great price with no complaints about the service.  Although I am installing in a Dell, the card was branded for Toshiba, but this is not a problem because Intel cards are Intel cards regardless of how they are labeled.


Router Setup Steps

Before installing the card, you need to spend a few minutes at the router.

For instructions on how to setup a home network, see this detailed Keyliner article: Link: EA2700 - First Time Setup - Home Networks

then follow these important, non-default steps to configure the 2.4G and 5G router channels so they run at their most optimal speed.  A fully-detailed article can be found here, or read below for a summary:  Link: Router Setup Steps - 5Ghz

Split | Personalities:

Newer routers can simultaneously transmit over two different frequency ranges -- the older 2.4Ghz and the newer 5Ghz.  Naturally, 5Ghz is better because it has more throughput and less interference with other household devices, such as desk phones and microwaves.

But, if you are not careful, your brand-spanky-new router might find itself running at 2.4Ghz on both sides.  Follow these steps to dedicate the 5Ghz side to only newer network cards.  If an older card is allowed to connect on the 5Ghz channel, that side will step-down and run at the slower speed, defeating the new hardware.


Using a Linksys Ea2700 as an example, manually configure the 5Ghz and 2.4Ghz in this manner:

Summary:
A.  Type the router's IP Address in a browser
B.  Login as Admin / (your admin password); see Setting up a Home Network Router
C.  In the Wireless tab, click "Wireless Settings"

Click for larger view
Recommended 5Ghz Setup:

Once in the Wireless setup screen, change from "Wi-Fi Protected Setup" to 'Manual".  (This disables the one-step setup-button on the router, but that was not a particularly good feature.  With the setup recommended here, you can type the password and connect and this is easier than getting up and finding the button on the router.)

Then make these setting changes on the 5Ghz side:

Related Keyliner link with similar content: Router Setup - 5Ghz

Network Mode:  "Wireless N Only"
(change from Mixed Mode).  This forces this side to only service newer network cards.
Older cards will be forced to the 2.4Ghz side.

Network SSID:
Invent a name for your 5G network, such as "wolfhouse5G".
Do not use spaces in the name and this name must be different than the 2.4G side.

Security Mode: Set to "WPA Personal".
Forcing to a newer encryption protocol.

PassPhrase:
This is the password/login workstations use to gain access to the network.  Invent any password or phrase.  Use this same phrase on the 2.4G side.  Write this down and tape to the bottom of the router, along with the Admin password.

Channel Width:  Leave at default (Auto 20 Mhz or 40 Mhz)

Channel:  Auto

SSID Broadcast:  Enabled (recommended)

Note: Why Broadcast SSID?  Some new Windows 7 / 8 features will not work without a broadcast SSID -- and hiding the SSID won't help keep the bad guys off your network.  This can be sniffed in a heartbeat.  If they are good enough to break the encryption, they have the SSID and your Mac addresses already.  Quit wasting your time.


Recommended 2.4Ghz Setup:

Network Mode:  "Mixed"  (default).
This allows all 802.11 a/b/g traffic to connect. 

Network SSID:
Invent a name for your 5G network, such as "wolfhouse24G".
Do not use spaces in the name and this name must be different than the 5G side.

Security Mode: Set to "WPA2/WPA Mixed Mode".
This is needed to accommodate older network cards.

PassPhrase:
This is the password workstations must provide in order to get access to this network.
I recommend using the same passphrase as the 5G side, but it can be different.

Channel Width:  Leave at default (Auto 20 Mhz or 40 Mhz)

Channel:  Auto

SSID Broadcast:  Enabled (recommended; see above)


Save the Settings.

Now, return to the laptop's new Network card's installation.


Laptop Network Card (NIC) Upgrade


On most machines, the laptop's network card is easy to get to and easy to replace.  Expect to spend about 15 minutes installing.  Follow these steps.  You will need a small flat head screwdriver and a small jeweler's Phillips screw driver, a crowbar and sledgehammer.

Notice I am recommending Intel cards rather than other other brands because the drivers are better maintained with new operating systems. 

1.  Although Windows 7 and 8 will detect and install new drivers automatically, it is prudent and safe to have the network card's installation files on the local hard disk in case there is a problem in this area.

Download, but do not install, the Intel 4965AGN drivers from Intel. These drivers will be newer than those first installed by Windows.  On Intel's site, search for "4965AGN" and select your operating system. 

Download Link: Intel's site.


You will find two versions: I recommended the Drivers-Only "D" version vs the additional Software "S" version.  The Software version isn't needed as Windows 7 and 8 are doing a good job managing the wireless natively.  Note: As of this writing, Windows 8 drivers are not published; use the Windows 7 version. 

2.  Place a towel on a desk, protecting the laptop and for catching small screws.

3.  Turn the laptop over and remove the back access panels.  Each laptop varies on how to do this, but this isn't rocket science.

Some cautions are in order:
  • Most laptops use tiny screws.  Do not use a small Phillips screwdriver; instead, use a small eye-glass or jeweler's screwdriver so the heads are not stripped from the access panel screws.  Trust me on this.
     
  • For most laptops, loosen the screw but do not not completely remove because they have tiny lock washers on the back side and completely removing the screw will loose the washer. Once loosened, gently pry the covers off as most have catch-tabs.


4.  Note how the card is marked with a "1" and "2"  (newer cards have 1,2,3 and some cards have black and white triangles.  These represent the antennae wires. 

Use a small flat-head screwdriver to gently pry off the original card's #1 and #2 antennae wires --  twisting the screwdriver head to pry upwards.  The connectors will pop off, straight up.  The connectors are fragile.  Of interest, these are the wires that lead to the antennae wrapped around the LCD panel.


5.  Remove the (one) screw that holds the card in place.  When loosening the screw, use a finger to press and hold the card in place.  The card is spring-loaded and when the screw is loosened it will catapult the tiny screw to places unknown.

6.  With the new card, re-connect the antennae wires.

Because the black and white wires are tiny and hard to manipulate, connect the wires before installing the card.  Center the wires on the post and press firmly until they click.  They are fragile and you must do this with care or the connectors can be damaged.   On a two-wire antennae,  #1 is white, #2 will be black.  Unless your laptop has three wires, ignore the center connector.


7.  Install the card into the slot and attach to the frame; snake cables back into their original positions and return the back covers.  You are ready to go.

Boot the computer.  Windows 7 and newer will detect the card and install base drivers.  Do not bother connecting to the network yet.


Drivers:

Install the Intel drivers downloaded earlier.  While installing, the Intel logo whirls but doesn't say much.  It will install and close without comment.  Because you can't tell when it is finished, give it about 3 minutes to complete.

Next, open your System Tray's network icon and connect to the 5G network.  You will see two or three networks broadcast from your home, "wolfhouse5G", "wolfhouse24G" and possibly "wolfhouse24G-Guest".   Choose the 5G and type the access code when prompted.
Do a big file copy and pat yourself on the back for quality, competent work. 


Related Articles:
Linksys EA2700 Router Review
Linksys EA2700 - First Time Setup - Home Network
Router Setup - 5Ghz
Setting up a Brother Printer on Wireless