After digitizing a movie, I wanted to copy a large 4G file to an Android tablet and was surprised at how challenging this was. Symptoms: Windows starts the file copy but does not get past the estimated time calculation and the copy fails.
Normally it is a simple matter to connect the tablet to the computer with a USB cable and copy the files with Windows Explorer. However, there is a known Microsoft Windows limitation where Explorer runs out of cache and the file copy may fail. I have seen inconsistent results where some large files succeed while others fail; reasons undetermined.
Wish you could Map a drive on an Android
In a perfect world, you could "map" a drive letter to the Android through the USB cable -- actually, this would be interesting with any USB device, but this is not possible. *If* a drive letter/UNC could be assigned to the tablet's folders, there are several tools which can always copy large files:
- Use DOS XCOPY with a /J switch -- Starting in Windows 7 2008R2, "/J" tells XCopy to use an unbuffered (non-cached) copy and was especially designed for large files.
- Use RoboCopy (a Microsoft utility designed for automated batch copies), which also works well with large files.
- Consider using teracopy http://codesector.com/teracopy, which I have not yet tried, but seems popular on the net.
Why not copy to an SD-Card?
SD Cards are almost always formatted as FAT32 (a file system format) and they cannot handle files larger than 4G.
Using FTP to copy Large Files
Because I could not get my copy to run, I used FTP (File Transfer Protocol). This was a much slower than a local copy and even though the tablet was connected via USB, I had to make the copy over wireless. A 4G copy took about an hour. Here are the steps I used and these steps work inside of your local (home) network.
1. From the Android control panel / Settings Screen, find your tablet's IP Address. You will need this during the file-transfer step.
With my Asus Transformer tablet, this was found in the System, scroll down and tap the "About Tablet" menu. Click "Status". Note the IP address. For example, my device was 192.168.200.124
2. From the Android Play Store (App Store), download and install the free "My FTP Server" to the Android. This simple app turns you Android into an FTP Server.
"My FTP Server", by Boby Ertanto
As of 2012.07, version 1.4
3. Once installed and launched, click the "Tools" gear-icon (upper-right corner).
For security, change the user-ID to an ID of your choosing, I used "user"
Change the password
[x] Check "Keep phone awake"
Save
Click "Start Server"
When the ftp server starts, ignore the displayed ftp url, you really want to use the IP Address.
4. On your local PC use any Windows-based FTP Client and connect to the Android's new FTP service.
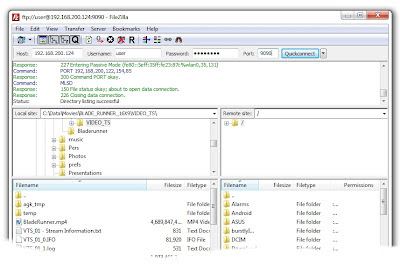
Note: Windows does not come with an FTP client (The built-in DOS FTP will not work because the Android software will use Passive-mode FTP). The easy work-around is to use a more sophisticated client. I like to use the free and easy-to-use FileZilla FTP Client. http://filezilla-project.org/. Screenshot below; click for a larger view.
Connecting with FileZilla:
Host: 192.168.200.124 (your address will be different)
Username: user (or as set above)
Password: (as set)
Port: 9090
Click button "QuickConnect"
5. Upload the file (copy) to the Android.
From the Source window (left-side), click and drag the source file from the left-side to the right. The file transfer will run.
6. When done, on the Android, stop the FTP Server (tap "Stop Server") and close FileZilla.

Tidak ada komentar:
Posting Komentar