Kamis, 31 Mei 2012

Using VistaPrint Business Cards

Review: Using VistaPrint for Business Cards

I wanted business cards to give friends, advertising this site and thought I would give the online retailer "VistaPrint" a try.  They advertise 250 cards for $15 and claim 10 million + 1 new customers during the past year.


As you will see, everything is a`-la-carte and if you want a nice card, the cost will be higher.  Even with this, I was pleased.


Templates and Designs

When the site is opened, you can immediately begin designing a card or letterhead without even signing in.  The card can be completely designed, risk-free, but an account is obviously needed in order to save or send for printing.  Building an account only takes a minute and it does not ask for a credit-card until the actual purchase. 


Vistaprint has a remarkable 5,000 royalty-free template library -- or you can create your own, uploading your own artwork or logos.  Templates are organized by category, such as Modern, Events, Humor, Patriotic, Floral, and dozens of others. All elements can be moved, rotated, sized and colored.

Sample Card Templates

You are limited to their font library (web fonts?), which is ample, but not extraordinary.  For most, this should be adequate.   

Design your Own

I chose to design my own template and there is no other way to say this: The whole process was fun. 

Here is the resulting card, which I'm sure you are already bored with, but in my defense, I wanted a simple, understated design with room to write.


Beyond a basic colored background, with simple text, almost everything else has an incremental cost.
  • Base Card qty 250, color background: $14.99
  • Each graphic or photo upload: $3.74
  • Black and White backside printing: $3.49
  • 130lb thicker matte paper stock: $6.49
  • Recommended PDF Proof: $1.49 ea.
  • Free shipping and handling: $0.00

With my changes and additions, the total cost went from $15 to $34, with free shipping.  At any point up to printing, you can cancel any changes or requests. Once the design is approved and committed for print, you cannot make changes.  My final order details:

Click for larger view


Comments about the Design Process:
  • Exactly positioning the text is easy, but in my case, I needed three justified columns and I had to use an html table.  The table-design tool was simplistic, but it got the job done.  Because I used a table, I could not use the automatic fields for Phone-number, address, etc. 
     
  • You are charged for each uploaded graphic.  Unknown to me at initial design, the graphic can be moved and positioned anywhere on the card.  Not knowing this, I uploaded the graphic three times with different margins, as I tried to position it as needed.  I feared I would be charged for three uploads but was not -- only being charged for the final graphic.  This was done right.  The backside graphic was an additional cost.
     
  • I had minor troubles with the text on the backside -- the program wanted to use the pre-filled fields (address, city, phone, etc.) and it took a few moments to override.  As expected, the backside text was an additional charge, as it should be.  It was nice to be able to select a different color than the front.
     
  • During the design phase, all images are "rough" and pixellated.  A PDF proof is available for $1.50.  I was confused about the PDF process, expecting to see the file on the screen, and not seeing it, I continued with other design work.  I realized later it was emailed and the file was a snapshot in time.  When the PDF was opened, it warned me it was "dated" and other layout changes had been made.  Fortunately, the PDF showed a tiny, one pixel layout problem that was undetectable on the screen.  Each time you request a PDF, you are charged.
     
  • Be aware during spell-check, the site crashed twice, but the page re-loaded exactly where I had left it.  If you had already built an account, it would be wise to save your design periodically.  The file is saved on their server.

Completing the Order:

Be prepared for an onslaught of advertising as you complete the order.  Everything from logo pens, tee shirts, business card holders, coffee mugs, truck mud flaps*, tow-straps, and hay-bales are offered (*exaggeration admitted). It will take several minutes to get through these and it was interesting to see my airplane graphic on each of the items.  It was an admirable attempt to sell more product.

Beyond that, ordering and payment is easy, with no real complaints.

Remarkably, the card was designed late on Friday nite and was shipped on Saturday, the next day.  Amazingly, the cards arrived on Monday with standard, free shipping. These folks don't mess around.

Reading their license agreement was interesting.  You have to agree that all logos and designs uploaded by you are not copyrighted or trademarked designs and you are responsible for their legality.  You also have to agree that other companies may use the same templates and Vistaprint is not responsible for other similar or identical designs. 

Results:

I liked how the site worked and even though I have as much artistic talent as a rock, I got the results I wanted in 3 days. The cards arrived exactly as designed.  250 cards on the thicker card stock, is about 9cm deep (3.5") worth of product.  For $6 more, I could have ordered 500 cards.

It appears to be printed with a lithographic offset printer.  The color matched what I expected.  Printing was perfect, even with small white letters on a dark background. 

The graphics, being as small as they are, are slightly indistinct even though the JPG image was moderately large.  Looking at the print through an 8x magnifying loop, you can see the image is made of small dots, the same as newspaper photographs.  This is not photographic quality, and part of the perception is due to the matte paper.  If printed on glossy, it would probably mask this better.  With this said, the graphics are acceptable.

If I were doing this again, I would look for a heavier stock than 130lbs (the inbox advertisement implies this is their new standard.  Anything thinner would feel cheap).  I would also spend more, using glossy paper, giving the cards a more refined look.  I do not know if these are even options and could not tell if the glossy-stock was also 130lbs.  Beyond this, no complaints.  I am pleased with the results. 

This was a fun project and I would do it again.

Kamis, 24 Mei 2012

Burning an ISO Image in Windows 7

How To: Burning an ISO Image with Windows 7, Vista, Windows 8

Vendors may distribute software with a downloadable "ISO" image -- an image of a CD/DVD. The downloaded file will have an .ISO extension and is often of substantial size.

You cannot copy the file directly to a CD/DVD and expect to use it. Instead, it must be expanded (somewhat like a ZIP file) and it must be written to the disk using other software. With Windows XP, you had to either purchase or find freeware software to do, with my favorite being the free "FreeISOBurner.com".

Starting with Windows Vista and newer, you can burn the file directly from the operating system without a third-party product.

In other words, Microsoft finally provided a utility that should have been part of the operating system.  As you will see below, the program has shameful rough edges and lacks other expected features  -- but the process works well enough to accomplish the basic goal.

Steps:


Provided you are on Windows Vista or newer, the disk can be written directly from the ISO; no additional software is required. The process is easy and without frills.

1. Download and store the ISO to a known location on any drive.

2. Insert a blank CD or DVD. When Windows prompts to write files to the disk, dismiss the dialog.

3. With Windows Explorer,

Locate the .ISO file.
"Other-mouse-click" (right mouse) the ISO file.
Choose"Burn disk Image".
Using "Verify" is unnecessary for most burns.
The disk will automatically start burning.


When done, Windows will announce the disk is ready.

Confirm:
From Explorer, the disk will contain various files and directories -- exactly as the original CD looked when the image was first built by the vendor.  Total burn time varies, depending on the size and complexity of the original disk.

Issues and Missing Features


Oddly, there will not be a progress bar while burning, but at the very end, the bar will show 100%, which is less than helpful.

The CD/DVD drive may be noisy with whirring and other mechanical sounds for the first minute but it should be smoother and quieter as the burn progresses.  Be sure the blank cd/dvd is free of fingerprints and is centered in the tray when inserted; both can cause noise as the disk tries to recover.  If the drive continues to be noisy, I would eject the disk and try another. 

On Windows 7 I have noticed the desktop locks up for the first few minutes of the burn.  You may not be able to open or use other programs.  Be patient. 

You cannot choose the burn-speed.  Many, including the author, prefer to burn at slower 1x or 2x speeds - for more reliable burns, but you do not have a choice.  With this said, I've not had problems burning disks so this may be old news.

Windows task manager will show a task, "ISOBurn.exe", which is a command-line utility.


Mounting the ISO image as a Drive Letter

Windows XP through 7 cannot mount an ISO as a virtual disk, with its own drive letter, without using third-party software. I recommend looking at "SlySoft.com's free Virtual CloneDrive".  The vendor has an extensive list of of other interesting CD/DVD programs.

For inexplicable reasons, every other operating system allows you mount the ISO file as a drive, without having to actually write a physical disk, but Microsoft left this feature out.  All other operating systems can mount ISO files and with this you can retrieve individual files without having to waste a plastic-disk. 

Starting with Windows 8, it automatically can open an ISO as a drive letter (at least when downloaded and opened with IE), or you can use a less-than-elegant PowerShell command-line can mount the drive but you can't pick which drive letter is assigned and you can't browse to the ISO file.  In other words, this is not something I would show my Mom:

Rough instructions:
a)  Launch Powershell as Administrator.
b) Mount-DiskImage -ImagePath "C:\data\downloads\myfile.iso"

Remarkably, you cannot choose the drive letter.  It starts at the bottom of the alphabet and moves up. For most, check drive Z:.
To unmount, use
Dismount-DiskImage -ImagePath "C:\data\downloads\myfile.iso"


Making a CD/DVD Image Bootable

Many ISO files are bootable.  This must be imbedded in the original ISO file, from the vendor.  You cannot make the ISO file bootable after-the-fact. 

If the disk is expected to boot, but does not, the issue is likely with your local machine's BIOS.  Make sure the bootorder is set to boot the DVD before the hard disk and you need to press a key (usually F2 or F10) at the BIOS-screen when booting.  Contact your computer/motherboard manufacturer for details on how to set the BIOS properly. 


Building your own ISO file

Once again, you will have to use a purchased, third-party product, such as Roxio, Nero or others.  Likely, the Roxio software that came with your computer will not burn the file without upgrading to the vendor's full-priced product.  I have had no recent experience with these products, but would probably recommend the relatively expensive Roxio, by Corel Software.

There are other shareware products on the net, but I have not had experience.  Reader comments are welcome.

Sabtu, 19 Mei 2012

WordPerfect - Setting Default Tabs at 1/4 inch

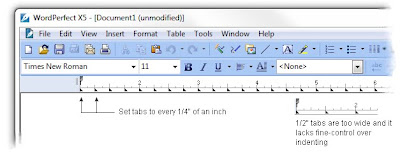
Howto: Set WordPerfect's default tab stops to 1/4 of an inch; much tighter than the default 1/2 inch. 

Set a default tab (ruler-bar) for this and all new documents. By default, tab stops are every 1/2 inch -- which is too wide. Set the tab-settings every 1/4" inch. This also sets a handy Margin Release. This same screen can set a default font, widows and orphans, and other default settings.


This article is a subset of a longer Keyliner article: Using WordPerfect for School Papers.


Setting Tabs:
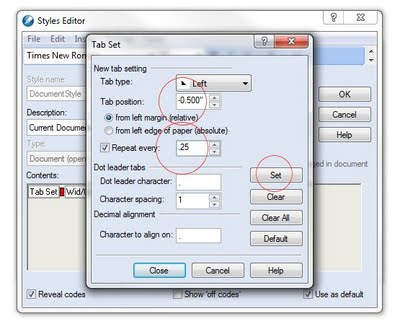
1.  From any (blank) document, choose top menu Format, Styles: Choose "DocumentStyle"

2.  Click Edit to open the "Style Editor"

Important:  Confirm "[x] Use as default" is checked in the lower-right corner

3.  Click the mouse in the "Contents" text-section

4.  Choose sub-menu, Format, Line, TabSet

5.  Confirm Tab Type = Left

6.  Change Tab Position to -0.5 (negative point 5)

7.  Click box [x] Repeat every .25 (point 25)

8.  Click "Set", then Close.
(Note in the Reveal Codes a new "TabSet".  There should only be one TabSet code; delete any duplicates or older codes you may find before making the new tab-setting.)

Also Recommended:

While in the same Contents Text box, you can also set these recommended settings:
  • Default Font
  • Default Font Size
  • Widow and Orphan Protection (Keep Text Together)
End results look like this:

Click for larger view


Margin Release Example:

Notice how tab stops are set 1/2" to the left of the Left margin (-.5) -- this is called a "Margin Release." Often, in a paper, a Hanging Header is needed. With this setting, you can quickly type a bolded title that "sticks out past the margin" without having to fiddle with the ruler-bar or with margins.

Click illustration for a larger view; click right-x to return

To use the Margin Release:
  • At the beginning of a paragraph, press Shift-Tab to hang the heading. Press shift-tab a second time to go one more stop to the left.


Related articles:
Using WordPerfect for School Papers
Protect Text Across Page Breaks
Hanging Indents past Left Margin
WordPerfect Sets Tabs in White Space

Wordperfect Office X5 Home & Stud Mb Cs Wpx5enhsmbc


WordPerfect Inserts Tab on Mouse Click

Howto: Stop WordPerfect from inserting a tab when mouse-clicking in white areas of a paper.

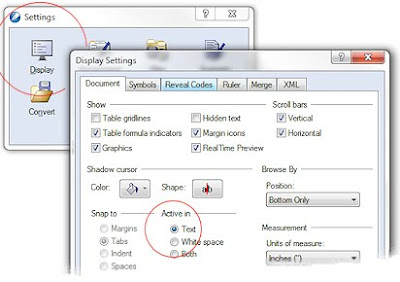
By default, WordPerfect has the mouse set to "Active" in WhiteSpace.  If you click the mouse in any white-space, WP will insert tabs in order to get the editing cursor to the position clicked.

This is, of course, the dumbest and most irritating setting imaginable.

Here is how to fix it.  This works in all versions of WordPerfect for Windows and makes the word processor behave more naturally.  This article is a subset of a more involved Keyliner article, "Using WordPerfect for School Papers."

Make this one-time change to WordPerfect's preferences.

Set the Cursor "Active in text"
  • In menu, Tools, Settings, Display
  • Select the first tab, [Documents]
  • Mark "Active in Text"
  • Click OK and close the preference screens


Related articles:
Using WordPerfect for School Papers
Protect Text Across Page Breaks
Hanging Indents past Left Margin
Setting Default Tabs at 1/4 inch